Configuration Page
# Configuration Page
Do you have environment variables to configure your app? Do you want the users to have easy access to these variables? Continue reading this page and find out how to create a configuration page like this.
What you see in the picture above is a dialog loaded from a sitemap. Using TypeScript, we have created functions to get environment variable values in the dialog. New values can be saved afterward.
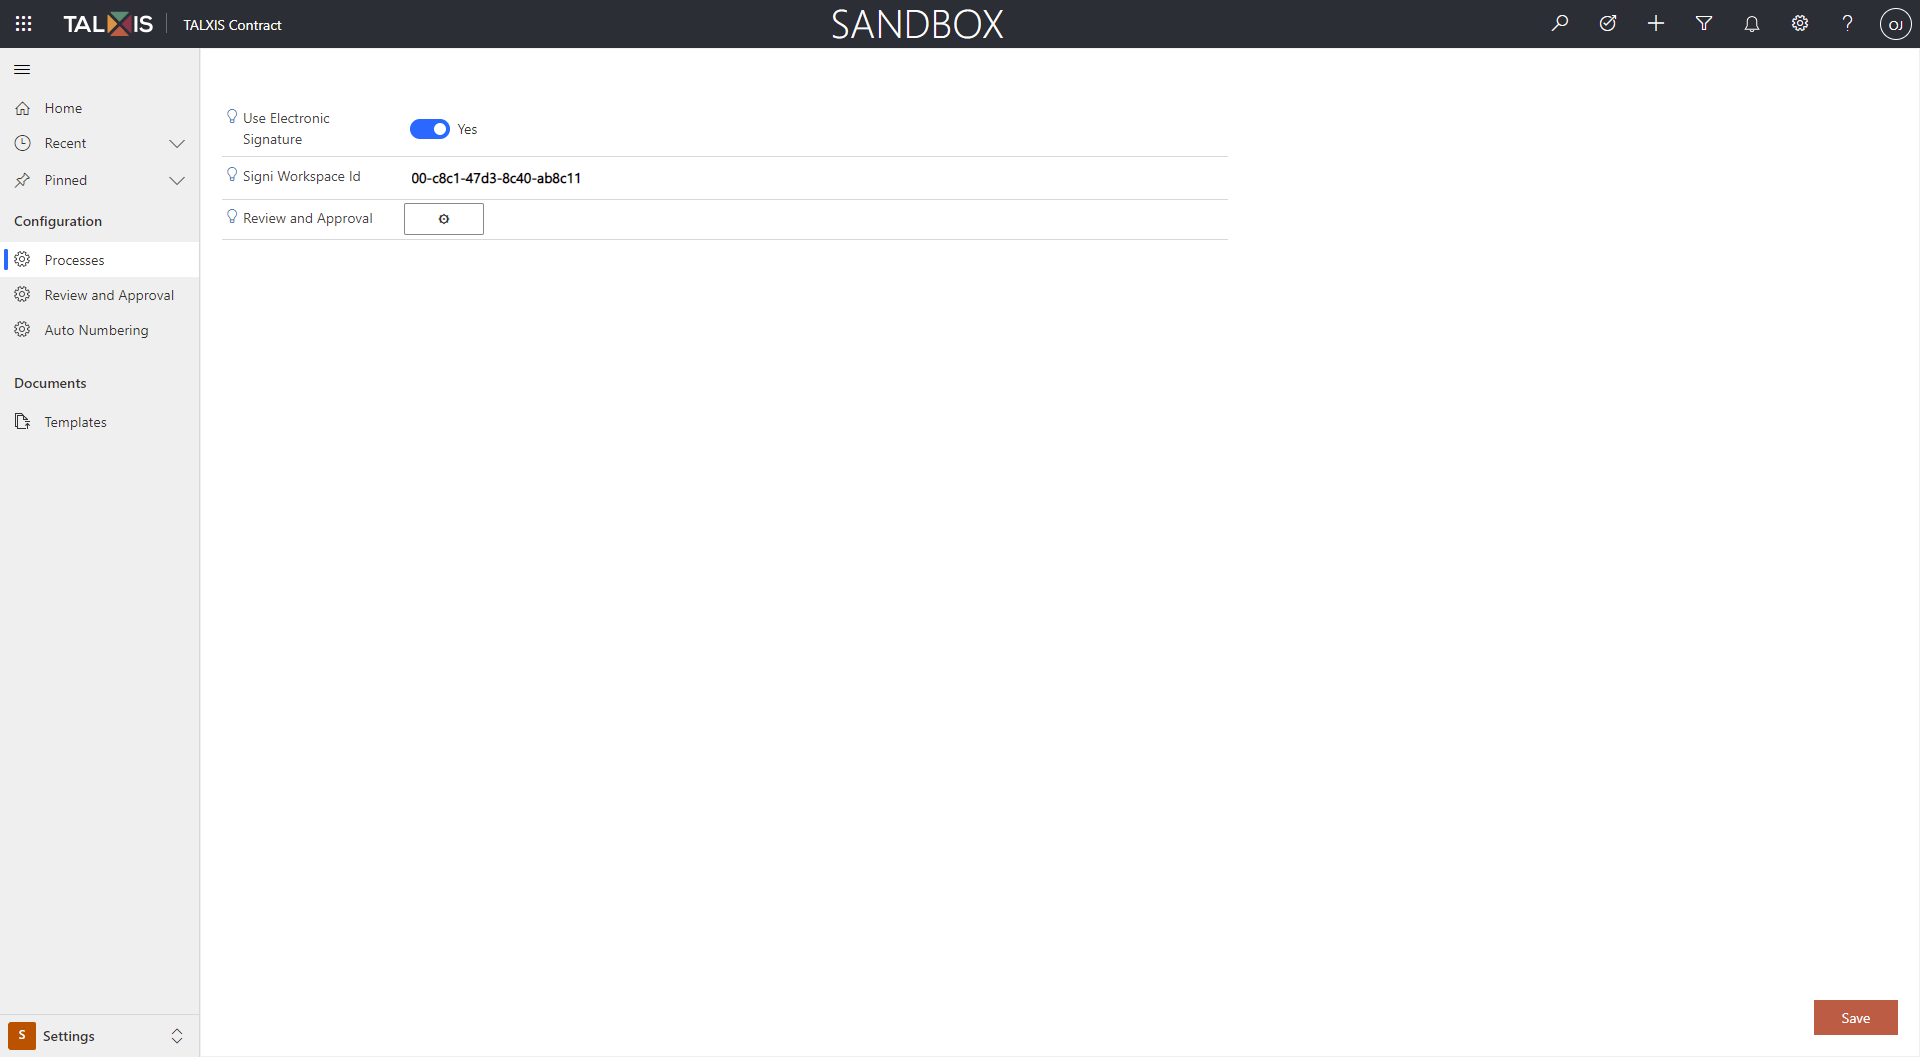
The example below will be demonstrated on a boolean environment variable called talxis_apps_contract_signature_useelectronicsignature.
# Prepare the dialog
# Create a dialog
If you don't have any experience with dialogs, we suggest you read this blog post: Custom dialogs in UCI (opens new window).
# Add an attribute in the dialog
We will use two option attribute because we are working with a boolean environment variable. It looks very similar to a two option attribute on classic forms, but there are small differences as you can see in the XML definition below.
Control id of the attribute needs to match the schema name of the environment variable you want to show there. The script will not work properly without it. Also, the environment variable schema name needs to match this pattern: talxis_apps_{module}_{feature}_{key}.
Don't forget to add parameters. You need to define OptionSetName because attributes on dialogs are not bound to any Entity.xml definitions.
<cell id="{b9b52296-f144-4727-a130-da4d9f1ebb06}">
  <labels>
    <label description="Use Electronic Signature" languagecode="1033" />
  </labels>
  <control id="talxis_apps_contract_signature_useelectronicsignature" classid="{67FAC785-CD58-4f9f-ABB3-4B7DDC6ED5ED}" isunbound="true" uniqueid="{6596aede-f09a-45ae-bc97-f2f51920899a}">
    <parameters>
      <OptionSetName>talxis_booleantwooption</OptionSetName>
    </parameters>
  </control>
</cell>
2
3
4
5
6
7
8
9
10
The mentioned option set needs to be a two option, bit, not an option set. There is a difference in definition. You can use the definition below.
<?xml version="1.0" encoding="utf-8"?>
<optionset Name="talxis_booleantwooption" localizedName="Boolean Two Option" xmlns:xsi="http://www.w3.org/2001/XMLSchema-instance">
  <OptionSetType>bit</OptionSetType>
  <IsGlobal>true</IsGlobal>
  <IntroducedVersion>1.0.0.0</IntroducedVersion>
  <IsCustomizable>0</IsCustomizable>
  <displaynames>
    <displayname description="Boolean Two Option" languagecode="1033" />
  </displaynames>
  <Descriptions>
    <Description description="This is global two option." languagecode="1033" />
  </Descriptions>
  <options>
    <option value="0">
      <labels>
        <label description="No" languagecode="1033" />
      </labels>
    </option>
    <option value="1">
      <labels>
        <label description="Yes" languagecode="1033" />
      </labels>
    </option>
  </options>
</optionset>
2
3
4
5
6
7
8
9
10
11
12
13
14
15
16
17
18
19
20
21
22
23
24
25
# Add a save button
Data on a dialog can't be saved as data on forms. We need to add our button and create onclick event. Put the definition below in the form tag. We will talk about the events later:
<tabfooter id="{a79f1328-c5fc-4fb7-a575-e99df7622afd}">
  <rows>
    <row>
      <cell id="{c2d86d33-b3e2-4277-9455-94b4698923c0}">
        <labels>
          <label description="Save" languagecode="1033" />
        </labels>
        <control id="tab1footersave" classid="{00ad73da-bd4d-49c6-88a8-2f4f4cad4a20}" isunbound="true" />
      </cell>
    </row>
  </rows>
</tabfooter>
2
3
4
5
6
7
8
9
10
11
12
13
# Add query string parameter
A query string parameter is something like a hidden field on a dialog. You can use it to store values in it. We will add one to our dialog so we can track the original values of environment variables. The unchanged data will not be updated thanks to this parameter.
The parameter has to be named talxis_originalvalues.
Add this part of code right under the opening form tag:
<formparameters>
  <querystringparameter name="talxis_originalvalues" type="Long" />
</formparameters>
2
3
# Add events
We have created TypeScript functions to load environment variable values on load and save them on click.
The functions can be found in TALXIS Utility Configuration.ts.
They handle getting and updating the environment variable values. They are stored in the records of two entities - Environment Variable Definition (opens new window) and Environment Variable Value (opens new window). The first one contains the schema name, default value and is parent to the second one. The second holds the current value of the variable.
Both entities expect the value to be stored as a string. The script needs to be able to change the value from the string to other types and back to the string when you retrieve it or update it.
Add events to onload and onclick save button:
<events>
  <event name="onclick" application="false" active="false" attribute="tab1footersave">
    <Handlers>
      <Handler functionName="TALXIS.Utility.Apps.Start.Configuration.SaveEnvironmentVariableValues" libraryName="talxis_contractappsdefault.js" handlerUniqueId="{f9f51b6e-3893-47ff-b8d1-4d6f22048a93}" enabled="true" parameters="" passExecutionContext="true" />
    </Handlers>
  </event>
  <event name="onload" application="false" active="false">
    <Handlers>
      <Handler functionName="TALXIS.Utility.Apps.Start.Configuration.LoadEnvironmentVariableValues" libraryName="talxis_utilityappsstart.js" handlerUniqueId="{cd9fd90f-497e-4ae9-a8ee-d25dc02202df}" enabled="true" parameters="" passExecutionContext="true" />
    </Handlers>
  </event>
</events>
<clientresources>
  <isvresources>
    <clientincludes>
      <webresource type="jscript" path="$webresource:talxis_utilityappsstart.js" />
    </clientincludes>
  </isvresources>
</clientresources>
2
3
4
5
6
7
8
9
10
11
12
13
14
15
16
17
18
19
20
# Add a toggle (optional)
You can choose to add a toggle.
If you don't want to look the attribute like this:

You can add a few lines to the dialog XML and make it look like this:

You want to look for the controlDescriptions tag and add there control definition. The guid in the control definition needs to match the uniqueid in the attribute definition:
<controlDescription forControl="{6596aede-f09a-45ae-bc97-f2f51920899a}">
  <customControl name="MscrmControls.FieldControls.ToggleControl" formFactor="0">
    <parameters>
      <value type="TwoOptions">talxis_apps_contract_signature_useelectronicsignature</value>
    </parameters>
  </customControl>
  <customControl name="MscrmControls.FieldControls.ToggleControl" formFactor="2">
    <parameters>
      <value type="TwoOptions">talxis_apps_contract_signature_useelectronicsignature</value>
    </parameters>
  </customControl>
  <customControl name="MscrmControls.FieldControls.ToggleControl" formFactor="1">
    <parameters>
      <value type="TwoOptions">talxis_apps_contract_signature_useelectronicsignature</value>
    </parameters>
  </customControl>
</controlDescription>
2
3
4
5
6
7
8
9
10
11
12
13
14
15
16
17
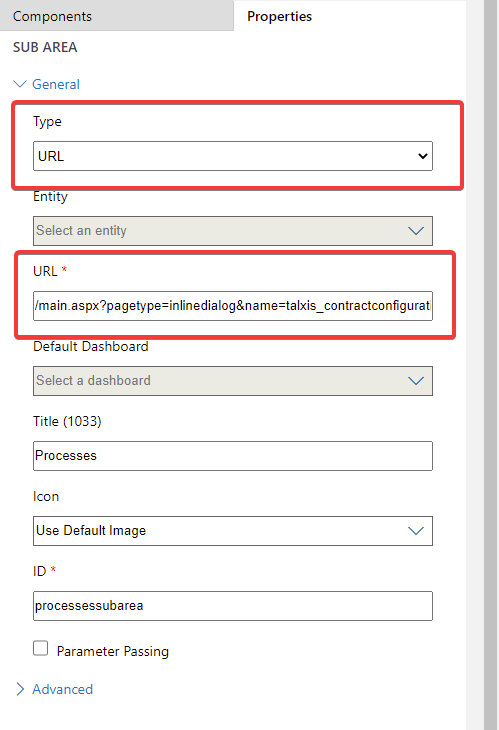
# Open the dialog from the sitemap
The last part is to add a subarea to a sitemap where you want to show this dialog.
We need to choose the type URL because dialogs can't be chosen explicitly.
Just add this part of url: /main.aspx?pagetype=inlinedialog&name={DIALOG NAME}.Don't forget to change {DIALOG NAME} for the unique name of your dialog.