Fill Excel Template
The Fill Excel Template action is used for filling complex excel templates. There are two main differences between our previous Fill Excel Repeater Template action and the new one. When configured correctly, this new action can fill multiple repeaters on different pages in the excel template. The second innovation is a new filler type - Area. Its functionality is described below.
Most of the information are already written in previous guide. Make sure to read it. Differences are described in this one.
# Excel template preparation
Excel template document example FillExcelTemplate.xlsx.
# Set template configuration
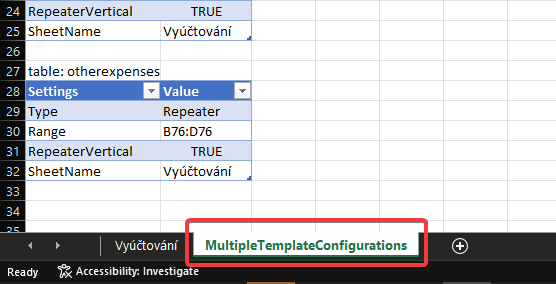
We will start with the sheet MultipleTemplateConfigurations. The filler configurations are stored in tables on this sheet. You can have as many fillers as you want.

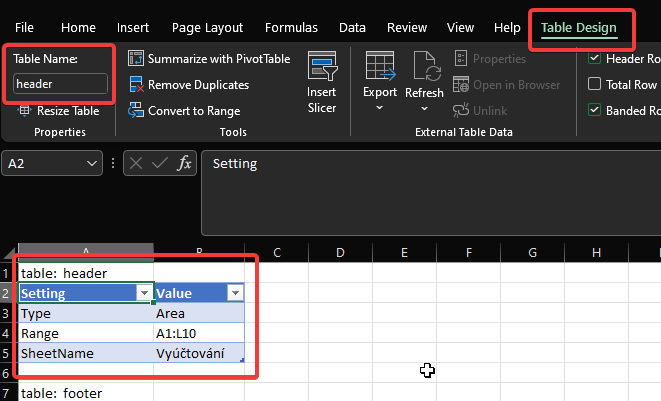
It is important to rename the tables. It must match the property name in the data object you will pass as input to the action.

Properties of filler configurations differ based on type:
# Area
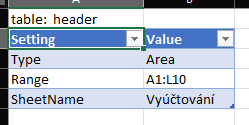
This filler is used for filling area that is not meant to be repeated. It is a document header and footer for example.
- Type - Area
- Range - a range of filler, e.g. how many rows and columns should be filled
For example A1, A1:E1, A1:A5, A1:E5
- SheetName - the name of a target sheet

# Repeater
This type of filler works the same as in the guide for Fill Excel Repeater Template action. There is a small change in the properties.
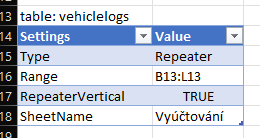
- Type - Repeater
- Range - a range of filler, e.g. how many rows or columns should be filled
- RepeaterVertical - boolean, set if data are being filled vertically or horizontally
- SheetName - the name of a target sheet

# Data structure
Also, the data structure is a little bit different here. The new action accepts a JSON. You need to keep in mind that the data are grouped under a property named after the filler configuration table. Let's look at two examples:
# Area
In the provided xlsx example, there is a configuration table named header to fill the header area. If you look below at the JSON with data, you'll notice the data object under the header property. This data will be used by the filler for the header.
# Repeater
In the provided xlsx example, you can find a configuration table named vehiclelogs to fill the log repeater. You can see at the JSON below, that there is an array of JSON under the property vehiclelogs. This array is used by the repeater.
{
  "header": {
    "month": 10,
    "year": 2021,
    "date": "23.11.2021",
    "username": "John Smith",
    "vehiclename": "FORD RANGER",
    "licenseplate": "ABC 1234",
    "totaldistance": 0
  },
  "vehiclelogs": [
    {
      "shiftdate": "1.10.2021",
      "projectid": "0903",
      "businesskilometers": 100,
      "privatekilometers": 20
    },
    {
      "shiftdate": "4.10.2021",
      "projectid": "0201",
      "businesskilometers": 200,
      "privatekilometers": 30
    }
  ],
  "fuelexpenses": [
    {
      "date": "3.10.2021",
      "name": "Fuel",
      "quantity": 74.01
    },
    {
      "date": "6.10.2021",
      "name": "Fuel",
      "quantity": 64
    }
  ],
  "otherexpenses": [
    {
      "date": "4.10.2021",
      "articleName": "Service",
      "amount": "708,00 Kč",
      "cardName": "FORD RANGER"
    }
  ],
  "footer": {}
}
2
3
4
5
6
7
8
9
10
11
12
13
14
15
16
17
18
19
20
21
22
23
24
25
26
27
28
29
30
31
32
33
34
35
36
37
38
39
40
41
42
43
44
45
46
# Connector input
The document input for the new action is the same as in the previous action.
The data property accepts a JSON as shown above.


