Project Repo Templates
# Guide for Repo Template
We had prepared templates with our code structure in our TALXIS NuGet Feed. In this guide are all necessary information needed to setup and use this feature.
Our goal is to create an instrument to automate maximum of repetitive tasks when source-controling code. Currently we are capable of creating whole project structure. We aim to be able to source control changes directly from exported solution to the code.
# DOTNET NEW Command
The dotnet new command creates a .NET project or other artifacts based on a template.
The command calls the template engine (opens new window) to create the artifacts on disk based on the specified template and options.
You can learn more in official MS Docs: dotnet new (opens new window)
# Installation
As mentioned before, our templates are stored in TALXIS Nuget Feed. In order for you to use them on your machine you need to perform few steps:
- Open Command Prompt or Visual Studio Terminal
- Copy and paste this command there an run it:
dotnet new --install TALXIS.SDK.CodeTemplates --interactive --nuget-source https://pkgs.dev.azure.com/thenetworg/_packaging/TALXIS/nuget/v3/index.json
- Go to this link: Device Login (opens new window) and paste there you authentication code. Your authentication code is written few lines under executed command:
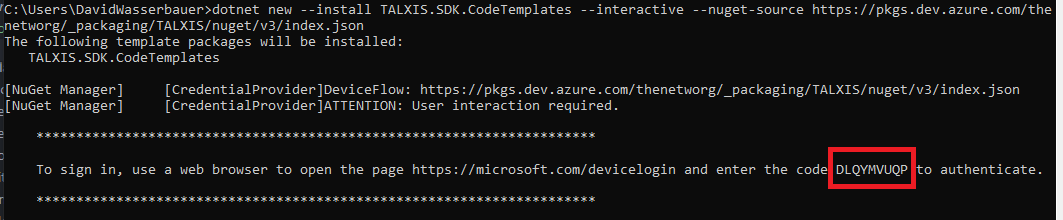
- You will be prompted to login so use your work account to authenticate.
- Available templates will be installed after sucessful authentication.
# Usage
Open CMD or VS Terminal and type dotnet new command with wanted template and parameters. There are general and custom parameters.
Custom parameters typically have default value which can be changed if needed. Be cautious when changing them for TALXIS.Root template because they are following naming convention which we have for project structure.
General parameters which have to be present everytime
| Parameter | Description |
|---|---|
| -o | Specifies the top folder name. |
| -n | Main parameter which specifies Project Code in our templates |
Custom parameters
These may vary. You can use -h parameter if you want to show them and their description.
Examples for templates types are shown below.
# Template types
After sucessful installation you are free to use templates provided in NuGet package. Currently we have let's say 4 template types of templates:
- Whole solution with .sln file prepared with all currently used projects under it, pipelines and package
- Module with possibility to specify projects under it
- Package (if more than the main one is needed)
- Single project (App, Feature, Model, Configuration)
# Whole solution
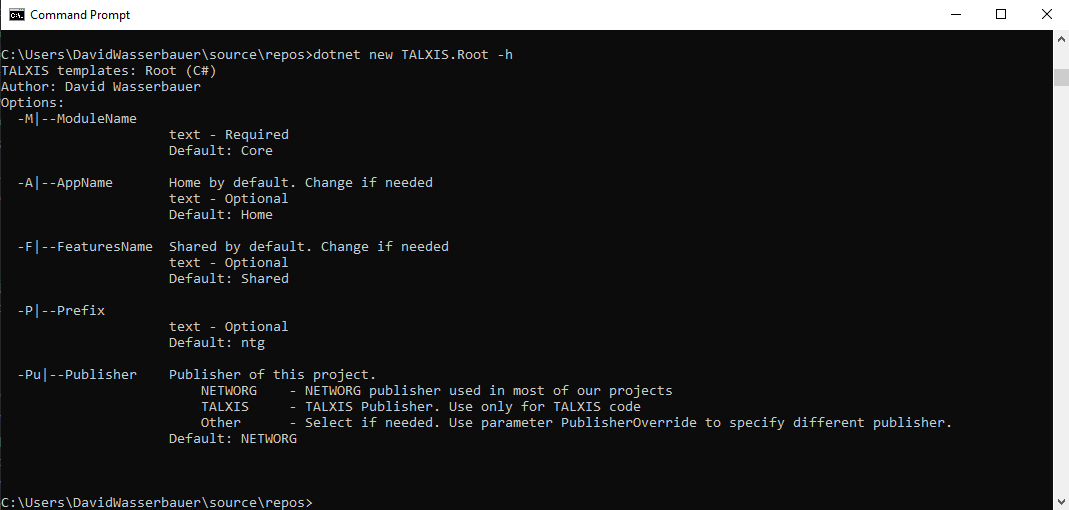
We aim to perform this action with every new project creation but it is possible that this step did not happen or it is not done yet. If the project you are working on do not have structure prepared then continue as described below. Before doing that please go through possible parameters with -h parameter.
Current parameters:
| Parameter | Shortcut | Description |
|---|---|---|
| --ModuleName | -M | The name of the main module. Default is "Core" and should not be changed. |
| --AppName | -A | The name of the main app. Default is "Home" and should not be changed. |
| --FeaturesName | -F | The name of all main feature projects. Default is "Shared" and should not be changed. |
| --Prefix | -P | The prefix. Default is "ntg". |
| --PublisherName | -Pu | Publisher name. Default is "NETWORG" |
Steps:
- Open command prompt
- Navigate to your repos folder. Example:
cd "C:\Users\DavidWasserbauer\source\repos" - Run command
dotnet new TALXIS.Rootwith all required parameters and optional parameters if needed. Example:
dotnet new TALXIS.Root -o PCT20020 -n PCT20020
- Open VS and open newly created folder "PCT20020" in your repos folder
- Source control your stuff in prepared structure 😃
# Module
Use this template if you need to add whole new module. You can use CMD or VS Terminal to do so. All you need is to navigate to src folder of the project you are editing and use the command there. You are again able to specify parameters to alternate final module structure.
Current parameters:
| Parameter | Shortcut | Description |
|---|---|---|
| --ModuleName | -M | The name of the module. Default is "Core" and this should be changed because Core module should be already present. |
| --AppName | -A | The name of the app. Default is "Home" and this should be changed because Home app should be already present. |
| --FeaturesName | -F | The name of all feature projects. Default is "Shared" and it can be changed. |
| --Prefix | -P | The prefix. Default is "ntg". |
| --PublisherName | -Pu | Publisher name. Default is "NETWORG". |
| --AppPresent | -Ap | Specifies if App project is present. Default "true". |
| --ConfigurationPresent | -C | Specifies if Configuration project is present. Default "true". |
| --FeaturesPresent | -Fe | Specifies if Features projects is present. Default "true". |
| --ModelPresent | -Mo | Specifies if Model project is present. Default "true". |
Steps:
- Open VS with Folder View
- Open src folder in VS Terminal
- Run command
dotnet new TALXIS.Modulewith all required parameters and optional parameters if needed. Example: *
dotnet new TALXIS.Module -o Modules.Sales -n PCT20020 -M Sales -A Default -F InvoiceTracking -C false
- Switch to solution view
- Manually add new solution structure and add generated .csproj files there (Goal is to automate this also but it is not that simple)
- Add project references in packages if needed
- This will create Modules.Sales folder with Sales Module in it with Project Code PCT20020 where the Configuration project is missing, App name is "Default" and Features projects have InvoiceTracking in name.
# Package
Use this template if you need to add new Package. Current parameters:
| Parameter | Shortcut | Description |
|---|---|---|
| --PackageName | -P | The name of the package. Default is "Main" and this should be changed because Main package should be already present. |
Steps:
- Open VS with Folder View
- Open src folder in VS Terminal
- Run command
dotnet new TALXIS.Packageswith all required parameters and optional parameters if needed. Example:
dotnet new TALXIS.Packages -o Packages.Sales -n PCT20020 -P Sales
- Switch to solution view
- Manually add new solution structure and add generated .csproj file there (Goal is to automate this also but it is not that simple)
- Add project references in package .csproj file and adjust ImportConfig.xml
# Single Project
Use those templates if you need to add a standalone project
Current single project templates:
- TALXIS.App
- TALXIS.Configuration
- TALXIS.FeaturesComposition
- TALXIS.FeaturesLogic
- TALXIS.FeaturesPresentation
- TALXIS.Model
Current parameters:
| Parameter | Shortcut | Description |
|---|---|---|
| --ModuleName | -M | The name of the module. Default is "Core" and this should be changed because Core module should be already present. |
| --AppName | -A | The name of the app. Default is "Home" and this should be changed because Home app should be already present. (Only for TALXIS.App) |
| --FeaturesName | -F | The name of all feature projects. Default is "Shared" and it can be changed. (Only for TALXIS.Features...) |
| --PrefixName | -P | The prefix. Default is "ntg". |
| --PublisherName | -Pu | Publisher name. Default is "NETWORG". |
Steps:
- Open VS with Folder View
- Open module folder in VS Terminal
- Run command
dotnet new TALXIS.{TemplateName}with all required parameters and optional parameters if needed. Example:
dotnet new TALXIS.Configuration -o Configuration -n PCT20020 -P Sales
- Switch to solution view
- Manually add new solution structure and add generated .csproj file there (Goal is to automate this also but it is not that simple)
- Add project references in packages if needed